Master Network Security: Raspberry Pi Monitoring Guide
Are you concerned about the security and performance of your home or office network? The Raspberry Pi, a pocket-sized computer, offers a remarkably effective, affordable, and versatile solution for analyzing, securing, and managing your network traffic. This isn't just about monitoring; it's about gaining control and understanding the intricate dance of data flowing through your digital life.
In today's interconnected world, your network is the gateway to your digital life, holding sensitive data, personal information, and access to countless online services. Protecting this gateway and understanding its inner workings has become paramount. Traditional network monitoring solutions can be expensive and complex, often requiring specialized hardware and expertise. However, a Raspberry Pi offers a refreshing alternative, a powerful tool capable of performing sophisticated network analysis tasks at a fraction of the cost and complexity.
This article will delve into the world of Raspberry Pi-based network monitoring, exploring its capabilities, benefits, and practical implementation. We'll examine the essential tools, the hardware requirements, and the step-by-step processes to transform this small device into a formidable network guardian. Whether you're a seasoned IT professional or a curious home user, this guide will equip you with the knowledge and skills to enhance your network's security, optimize its performance, and gain a deeper understanding of how your data travels.
The Raspberry Pis appeal lies in its adaptability. It's a blank canvas upon which you can paint a picture of your network's health and behavior. From simple bandwidth monitoring to advanced intrusion detection, the Raspberry Pi can be tailored to your specific needs. Its open-source nature fosters a vibrant community that constantly develops new tools and solutions, ensuring that your network monitoring capabilities remain at the cutting edge. This level of customization and flexibility makes the Raspberry Pi a truly exceptional choice for anyone seeking to take control of their network.
One of the key advantages of using a Raspberry Pi for network monitoring is its cost-effectiveness. Unlike expensive commercial solutions, the Raspberry Pi itself is relatively inexpensive, and the software used is often free and open-source. This makes it accessible to a wide range of users, from individuals to small businesses. The energy efficiency of the Raspberry Pi is another significant benefit, as it consumes very little power, minimizing operational costs. Furthermore, the compact size of the Raspberry Pi allows for flexible deployment, enabling you to place it discreetly within your network infrastructure without taking up valuable space.
To fully understand the value proposition of using a Raspberry Pi for network monitoring, let's consider a real-world scenario. Imagine a small business owner who is experiencing slow internet speeds and occasional network outages. Troubleshooting these issues can be frustrating and time-consuming, often requiring a technician to visit the site. However, with a Raspberry Pi-based network monitoring system, the business owner can proactively identify the root causes of these problems. By monitoring network traffic, bandwidth usage, and website performance, they can quickly pinpoint bottlenecks and optimize their network configuration. This can lead to significant improvements in productivity and customer satisfaction.
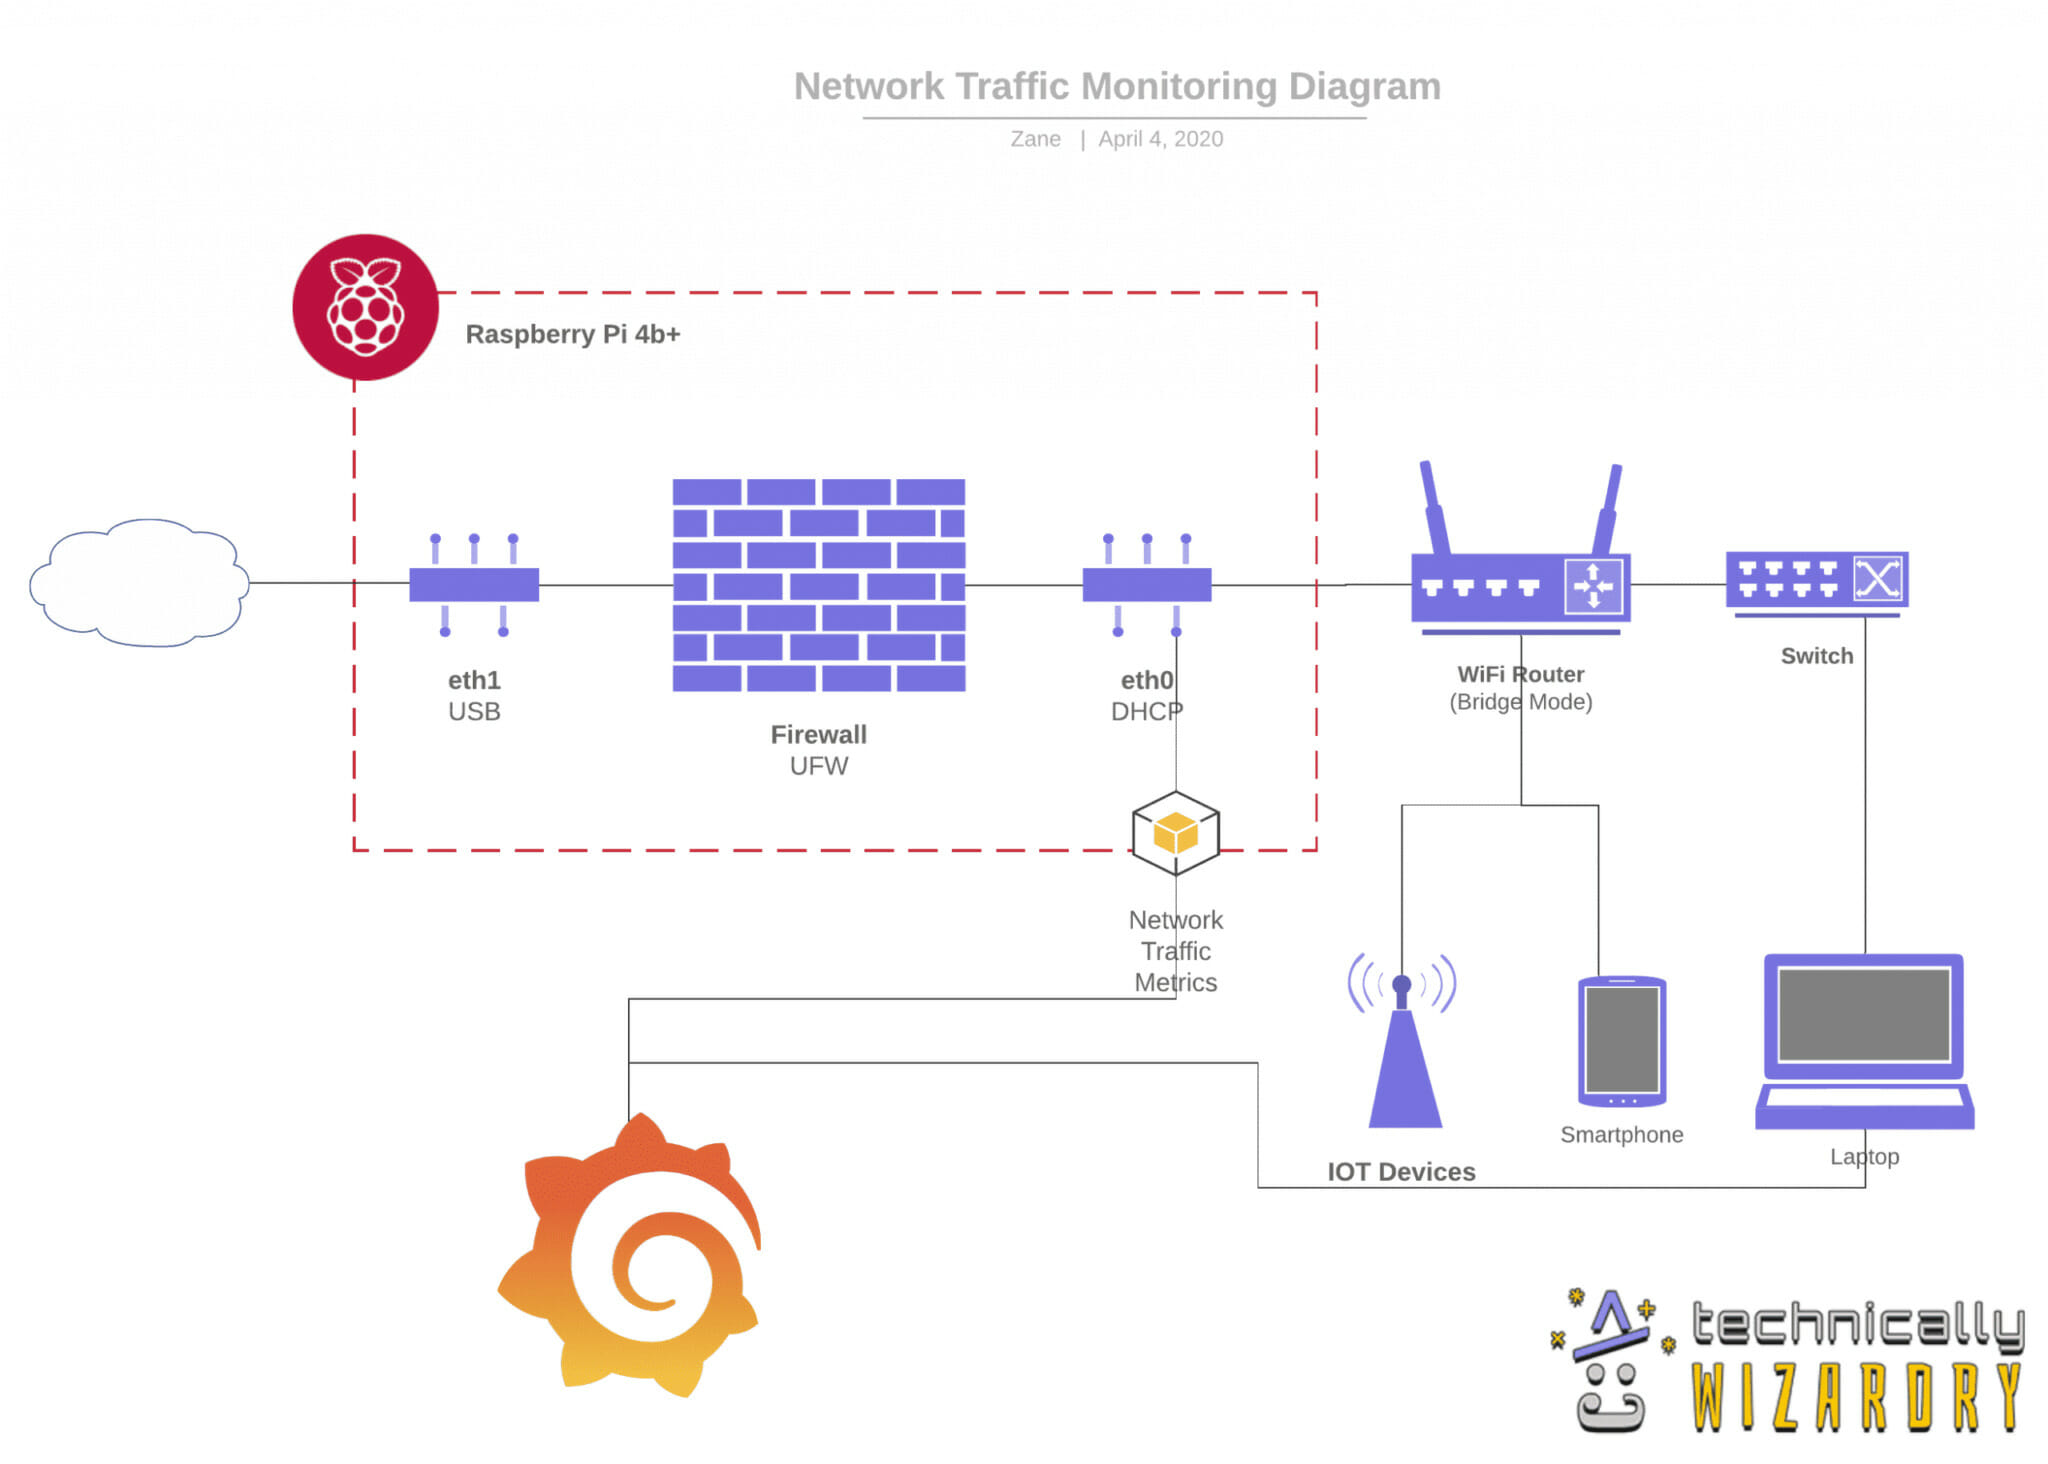
This guide will also explore the disadvantages of employing a Raspberry Pi as a network monitor. While the device is a powerful tool, it's not without its limitations. One notable caveat is that if you are using a Wi-Fi connection, the Wi-Fi traffic going to the router will not be directly monitored by the Raspberry Pi. This is because the Pi typically sits between the router and other devices on the network, and it cannot 'see' traffic that is already at the router level.
However, the advantages often outweigh this constraint. Consider the ease of deployment and removal. Should you decide to discontinue the use of your Raspberry Pi network monitor, simply unplug it and directly connect your Wi-Fi router to the switch. This is a stark contrast to more complex setups that can be difficult to dismantle. For this reason, among many others, a Raspberry Pi remains a fantastic option.
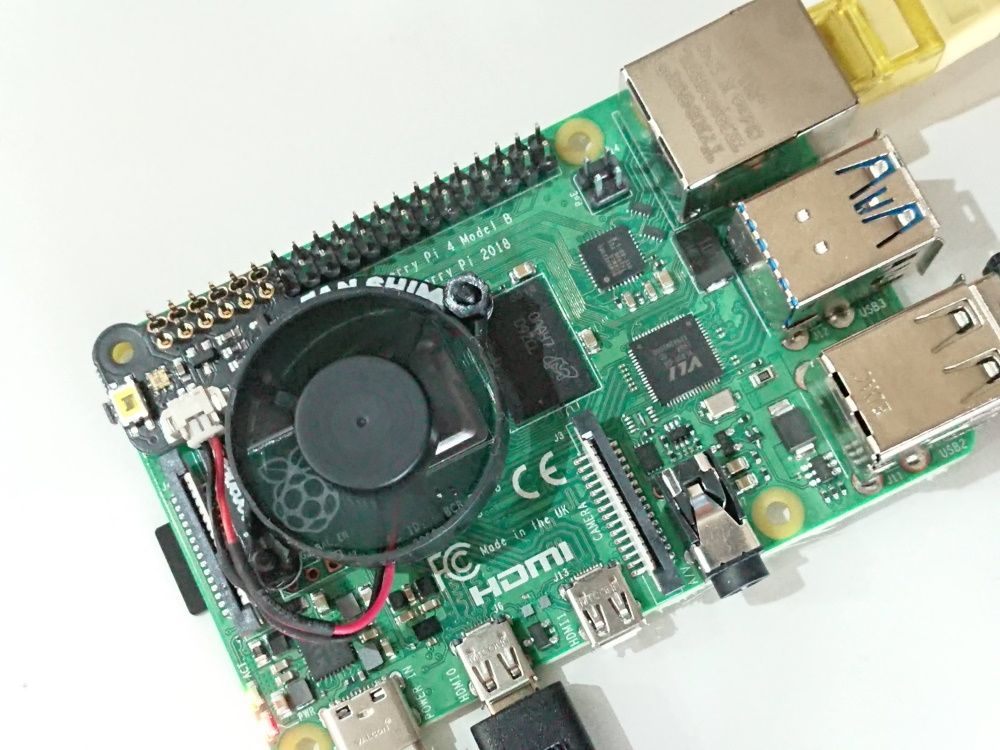
Before we delve into the specifics, let's break down the core components of setting up a Raspberry Pi network monitor. At the heart of the system, the Raspberry Pi 4 Model B is highly recommended. Its superior processing power and networking capabilities are crucial. This device is not just a computer; it is a gateway to understanding and controlling your network. Below, you'll find a comprehensive list of the necessary hardware and software components. This is an investment in proactive network management, offering control and insight into your network's inner workings.
| Hardware Component | Description | Recommendation |
|---|---|---|
| Raspberry Pi | The central processing unit for the network monitoring system. | Raspberry Pi 4 Model B (or later) with at least 2GB RAM |
| MicroSD Card | Storage for the operating system and network monitoring tools. | 32GB or larger, Class 10 or UHS-I recommended |
| Power Supply | Provides power to the Raspberry Pi. | USB-C power supply specifically designed for the Raspberry Pi |
| Ethernet Cable | Connects the Raspberry Pi to your network switch or router. | Cat5e or Cat6 cable |
| Network Switch (Optional) | Expands the number of available Ethernet ports, allowing you to monitor multiple devices. | Unmanaged or managed switch with sufficient ports |
| Enclosure (Optional) | Protects the Raspberry Pi from physical damage. | Any suitable enclosure for the Raspberry Pi 4 |
With the hardware in place, the next step is installing the necessary software. A variety of tools are available for network monitoring on a Raspberry Pi, each serving a specific purpose. These tools collectively offer a comprehensive approach to network analysis, providing insights into various aspects of your network's performance and security.
Here's a breakdown of some of the most useful tools, along with how to install them and what insights they provide:
| Tool | Purpose | Installation (Example - apt) |
|---|---|---|
| iftop | Monitors network bandwidth usage in real-time, showing which connections are consuming the most bandwidth. | sudo apt update && sudo apt install iftop |
| nload | A simple console tool to monitor network traffic and bandwidth usage. Provides real-time graphical representation. | sudo apt update && sudo apt install nload |
| iptraf | A real-time IP network traffic monitor that provides detailed information about traffic flows, TCP/UDP statistics, and more. | sudo apt update && sudo apt install iptraf |
| vnstat | Monitors network traffic over time, storing the data for historical analysis. Useful for long-term bandwidth monitoring. | sudo apt update && sudo apt install vnstat |
| nethogs | Identifies processes that are using the network, allowing you to pinpoint bandwidth-hungry applications. | sudo apt update && sudo apt install nethogs |
| Wireshark | A powerful network protocol analyzer that allows you to capture and analyze network traffic in detail. Provides packet-level inspection. | sudo apt update && sudo apt install wireshark (During installation, you might be asked if non-root users should be able to capture packets. Select Yes for ease of use.) |
| Nagios | A comprehensive monitoring system capable of monitoring network devices, services, and applications. Enables proactive alerts. | The installation of Nagios is more involved. See the Nagios documentation for instructions. |
Let's illustrate how to install and use some of these tools. The examples below assume you're using a Debian-based system like the standard Raspberry Pi OS (formerly Raspbian). You'll need to have an internet connection on your Raspberry Pi to download the packages. Open the terminal on your Raspberry Pi (either directly, by connecting a keyboard and monitor, or via SSH) and enter the following commands:
For example, to install `iftop`: sudo apt update && sudo apt install iftop. The first command updates the package lists, and the second command installs iftop. Once installed, you can run iftop by typing `sudo iftop -i eth0` in the terminal. This will display real-time bandwidth usage on the Ethernet interface (eth0). Adjust the interface name if necessary. To see Wi-Fi traffic, which is less common, you may need to use the interface name like `wlan0`.
Similarly, to install `nload`: `sudo apt update && sudo apt install nload`. Running nload is as simple as typing `nload` in the terminal. It will display real-time network usage graphs.
To monitor your network or remote devices, consider using Nagios. Nagios is a powerful, open-source monitoring system that can be installed on your Raspberry Pi. It allows you to monitor network devices, services, and applications, providing alerts and notifications when problems arise. Setting up Nagios involves several steps, including installing the necessary packages, configuring the monitoring settings, and setting up user accounts. While it requires a bit more setup, the benefits of using Nagios include comprehensive monitoring, proactive alerts, and historical data analysis.
Now, let's explore how to use a Raspberry Pi to measure your internet speed, DNS requests, and website performance over time. This allows for a more comprehensive view of your network's performance and helps you identify potential bottlenecks or issues. Tools like `speedtest-cli` (for internet speed), and customized scripts to analyze DNS requests and website response times, can be implemented.
Measuring your internet speed can be achieved using a tool like `speedtest-cli`. Install it using `sudo apt update && sudo apt install speedtest-cli`. Then, run it by typing `speedtest-cli` in the terminal. The tool will automatically test your download and upload speeds and display the results. You can schedule this to run automatically at regular intervals to track your internet speed over time and monitor for any slowdowns.
To monitor DNS requests and website performance, you can create simple scripts using languages like Python. These scripts can use tools like `dig` (for DNS lookups) and `curl` or `wget` (for website requests). The scripts can be scheduled to run periodically, logging the results to a file. This data can then be used to create graphs and charts to visualize the performance trends.
Here are some practical tips and steps to get you started:
- Flashing the MicroSD Card: Use a tool like Raspberry Pi Imager to flash the Raspberry Pi OS onto your microSD card. This is the operating system that will run on your Raspberry Pi. Ensure you select the correct OS and SD card.
- Configuring Network Settings: The Raspberry Pi should be assigned a static IP address by your Wi-Fi router to ensure consistent access and monitoring. See your router's documentation for instructions on how to assign a static IP.
- Connecting to Your Network: Connect the Raspberry Pi to your network via an Ethernet cable. If using Wi-Fi, configure the Wi-Fi settings during the OS setup.
- Installing Monitoring Tools: Install the tools mentioned above (iftop, vnstat, etc.) using the `apt` package manager.
- Analyzing Data: Use the tools to monitor your network traffic and performance. Analyze the data to identify any bottlenecks or issues.
- Automating Tasks: Use cron jobs to schedule tasks like running speed tests or collecting performance data.
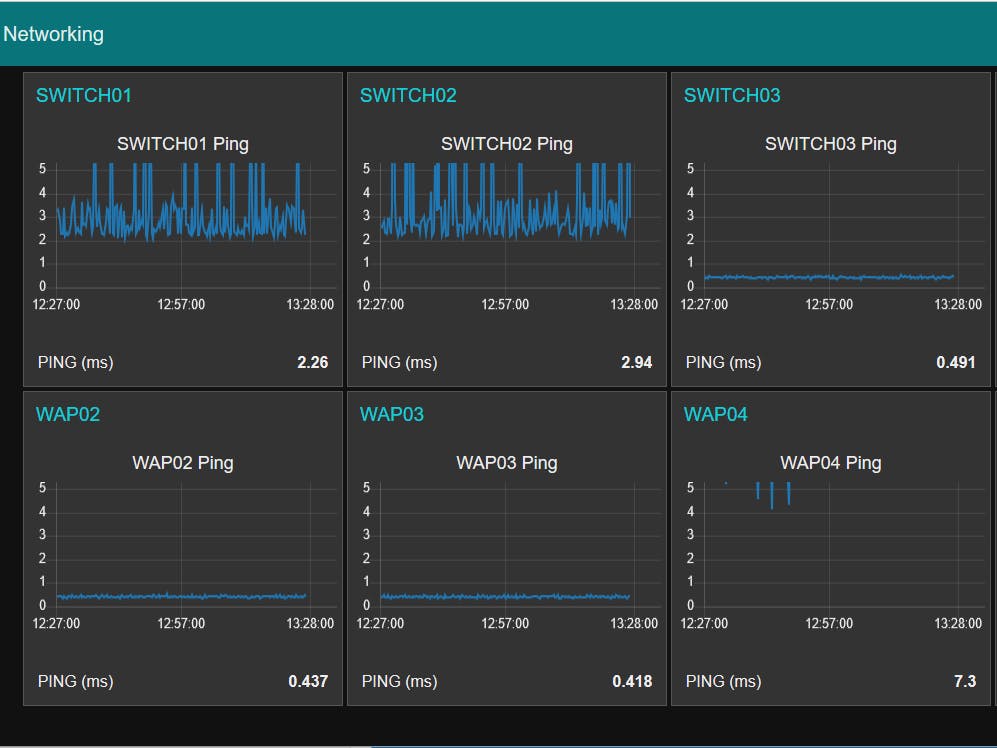
For an effective network monitoring dashboard, consider the integration of tools and the creation of a centralized visualization. Setting up a dashboard that aggregates the information from the various tools is crucial. A dashboard allows you to view the data in a clear and concise manner, making it easier to identify trends and potential problems. Several options are available for creating a dashboard, including Grafana, which can be used to visualize the data collected by the monitoring tools.
To enhance your network security, the Raspberry Pi can also be used as a network filtering device, offering a protective layer against potential threats. It can act as a firewall, blocking unwanted traffic and preventing unauthorized access to your network. It can also be used to implement content filtering, blocking access to specific websites or types of content. By configuring the Raspberry Pi as a network filter, you can create a more secure and controlled network environment, protecting your devices and data from online threats.
For those looking to boost network security, the Raspberry Pi is an excellent choice. The Raspberry Pi can be configured as a capable network filtering device for home or office use. It provides excellent value in this use case. It is an option to explore.
The journey of setting up a Raspberry Pi network monitor is a continuous one of learning and refining. As you gain experience, you will find new ways to leverage the device's capabilities, tailoring it to your specific network needs. The Raspberry Pi community is vast and vibrant, offering support, tutorials, and innovative solutions. Embrace the learning process, experiment with different tools, and customize your setup to create a powerful and effective network monitoring system that keeps your digital world safe and running smoothly.
With the right tools and techniques, a Raspberry Pi can transform your network from a black box into a transparent, manageable ecosystem. By investing in this knowledge, you are not just monitoring your network; you are empowering yourself with the ability to understand, secure, and optimize your digital environment. So, begin your journey, experiment with the tools, and witness firsthand the remarkable capabilities of this small but mighty computer.

