Raspberry Pi Firewall: Easy Setup With UFW - Guide
Are you concerned about the security of your digital world? In an age where our lives are increasingly intertwined with the internet, securing your devices, particularly small, versatile computers like the Raspberry Pi, is not just a good idea it's essential.
The ease with which we can access and utilize the internet has brought with it a corresponding increase in vulnerability. The proliferation of connected devices, or the Internet of Things (IoT), has widened the attack surface, making our digital lives susceptible to cyber threats. From personal data breaches to intrusions into our home networks, the potential consequences of neglecting cybersecurity are significant. This article delves into a practical method of enhancing the security of your Raspberry Pi: implementing and configuring a firewall using the 'ufw' tool. We will explore the "how" and "why" of securing this versatile mini-computer, making your digital life more secure.
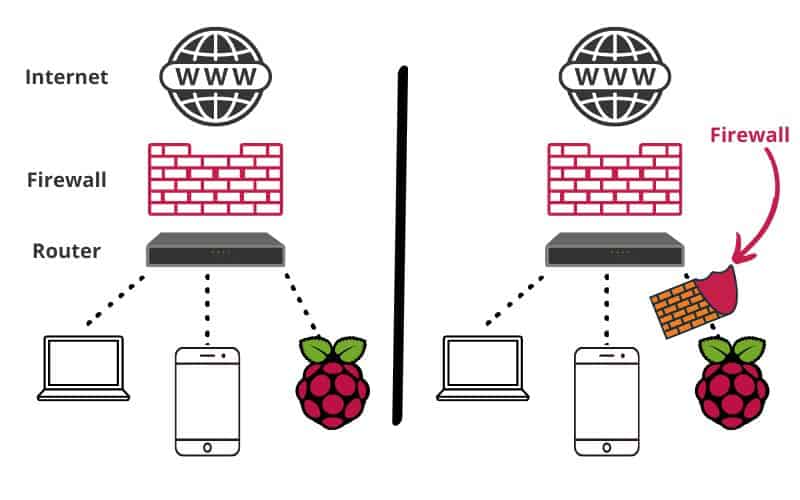
Before diving into the implementation, it's helpful to understand what a firewall actually does. At its core, a firewall acts as a barrier, or a gatekeeper, between your Raspberry Pi and the external world. It operates by examining incoming and outgoing network traffic, applying a set of predefined rules to determine which traffic is allowed and which is blocked. This prevents unauthorized access to your system and mitigates the risk of malware, viruses, and other threats. Think of it as a security guard, carefully scrutinizing every person (or data packet) that attempts to enter a building (your Raspberry Pi).
The tool we'll be using is called 'ufw', which is short for "uncomplicated firewall." The name is apt; ufw is designed to be user-friendly, making the configuration process relatively straightforward, even for those who may not have extensive experience with network security. The ufw is available in the default repository of most Linux distributions, including the Raspberry Pi's standard operating system, Raspberry Pi OS (formerly Raspbian), making installation and setup simple.
Now let's get practical. Before commencing the process of establishing your Raspberry Pi firewall, it's essential to ensure you have the necessary components and setup. To follow along, you will need the following:
- Raspberry Pi: Ideally, a Raspberry Pi 3 or a newer version is recommended. These models offer sufficient processing power and memory for a smooth firewall experience.
- MicroSD Card: A microSD card with a minimum capacity of 16GB is required. This will store your Raspberry Pi's operating system (Raspberry Pi OS) and the firewall software itself, along with any other applications or data you wish to use on your device.
- Network Connectivity: A stable network connection, either via Ethernet cable or Wi-Fi, is crucial to allow the Raspberry Pi to communicate with your network router and the internet.
- Access to the Terminal: You'll need access to the terminal on your Raspberry Pi. This can be achieved through a direct connection to the device (using a keyboard, mouse, and monitor), or remotely, using SSH (Secure Shell).
After you've collected the necessary items, ensure your Raspberry Pi is correctly set up, with Raspberry Pi OS installed on the microSD card. The process of installing Raspberry Pi OS is typically achieved by using the Raspberry Pi Imager tool. This software allows you to download and install the operating system directly onto the microSD card, with the Raspberry Pi OS official website offering detailed instructions on how to do it. Make sure to connect your Raspberry Pi to your network using either an Ethernet cable or by configuring the Wi-Fi settings during the initial setup.
Before you proceed, a brief consideration on whether installing a firewall on your Raspberry Pi is a good idea, or is it even necessary? The answer, in most cases, is a resounding yes. While routers often include basic firewall capabilities, setting up a robust network firewall can provide an extra layer of protection for your Raspberry Pi, especially if it's used for tasks like hosting a web server, a media server, or any other service that's accessible over the internet. This approach can provide an additional layer of defense in the face of evolving threats, enhancing your overall security profile.
The Raspberry Pis versatility means it often finds itself in various roles within a network. Perhaps it's acting as a home automation hub, a print server, a VPN server, or even as a gateway for your IoT devices. Each of these roles opens up potential vulnerabilities, making the need for a robust firewall more pressing. Even if your Raspberry Pi is used for less demanding tasks, a firewall still offers peace of mind, reducing the likelihood of unauthorized access and potential exploitation.
With everything in place, we can commence the process of enabling the ufw firewall on the Raspberry Pi. Once you have your firewall rules added using ufw, we can finally turn it on. For starters, we will configure the Raspberry Pi using the command line interface to make sure that the firewall is up and working.
The first step is to open a terminal. This can be done via direct connection to your Raspberry Pi or through an SSH connection, depending on your setup. The command that we will be using is: `sudo ufw enable`. This command instructs ufw to activate its rules and start filtering network traffic according to those rules. Before you run this command, its vital to set the rules that are required to allow traffic through the firewall. If you don't set any rules, ufw will block all incoming connections by default.
Before activating the firewall, it's vital to allow access for any services you require to be accessible from outside your Raspberry Pi. For example, if you want to use SSH (Secure Shell) to connect to your Raspberry Pi remotely, you need to allow port 22 (the standard SSH port) to pass through the firewall. If you are using SSH to connect to your device, you need to make sure that you have port 22 allowed. Otherwise, you will lose connection upon enabling the firewall.
You can enable port 22 using the following command:
sudo ufw allow 22This will allow incoming connections on port 22. You may similarly allow other ports for services such as HTTP (port 80) or HTTPS (port 443) if you are running a web server. To enable HTTP, you would use the command:
sudo ufw allow 80For HTTPS:
sudo ufw allow 443Furthermore, if you are using any non-standard ports for other services, make sure to allow those as well. When adding these rules, it's crucial to be precise to avoid unintentional exposure of your system. It's best to allow only the ports that are absolutely necessary.
Another useful command is to allow incoming connections for a specific port. You can specify a service name instead of the port number. For example, to allow SSH connections:
sudo ufw allow sshSimilarly, to allow a specific IP address to connect to all ports on your Raspberry Pi, use the following command:
sudo ufw allow from Replace
sudo ufw allow from 192.168.1.100Once you are happy that you have any important ports opened on your Raspberry Pi's firewall you can now switch it on. Enabling your firewall using ufw is as simple as using the following command within the terminal:
sudo ufw enableAfter running this command, the firewall will become active, filtering incoming and outgoing traffic based on the rules you've defined. If, at any point, you experience connectivity problems after enabling the firewall, don't panic. A simple solution is to disable the firewall and then check if the issue is resolved. In order to disable the ufw firewall, you will need to use the following command:
sudo ufw disableThis command will fully disable the firewall, allowing all traffic to pass through your Raspberry Pi. If, after disabling the firewall, your connectivity problems are resolved, it means your firewall configuration is likely the source of the issue. This indicates you need to review your firewall rules and make necessary adjustments to ensure the required traffic is allowed.
After successfully enabling the firewall, it's a good practice to check its status to confirm it's active and that the rules are as expected. You can do this using the following command:
sudo ufw statusThis command will display the current status of the firewall, including which ports are allowed and which are blocked. The output should confirm that the firewall is enabled and that the rules you configured are active.
To further refine your firewall configuration, ufw offers a range of additional features, enabling you to fine-tune the behavior of your firewall. This includes the ability to allow or deny traffic based on the network interface, the ability to log traffic to monitor network activity, and the ability to specify rules based on protocol (TCP, UDP, etc.).
For advanced usage, you can create more complex rules using ufw. For example, if you want to allow connections from a specific IP address and port to a different port on your Raspberry Pi, you can use the following command:
sudo ufw allow from to any port Replace
sudo ufw allow from 192.168.1.100 to any port 80Another helpful feature is the ability to delete or modify existing rules. To delete a rule, you can use the following command:
sudo ufw delete allow Replace
sudo ufw delete allow 80To modify a rule, the process is similar. First, delete the existing rule using the appropriate command. Then, create a new rule with the desired configuration. Remember, precision is paramount in firewall configuration. Incorrect or overly permissive rules can compromise your security.
For those looking for a more visual approach, ufw can also be used with a graphical user interface (GUI). One of the most popular GUI frontends for ufw is gufw. To install gufw, you can use the following command in the terminal:
sudo apt install gufwOnce installed, you can launch gufw from the applications menu. The GUI offers a user-friendly interface for managing your firewall rules. With gufw, you can easily add, delete, and modify rules. This can be particularly helpful for those who prefer a visual representation of their firewall configuration.
Configuring a robust network firewall is an important step toward maintaining the security of your Raspberry Pi and your broader network. By understanding the principles behind firewalls, utilizing the user-friendly ufw tool, and taking a thoughtful approach to rule creation, you can significantly reduce the risk of unauthorized access and protect your system from malicious threats. This process not only enhances the security of your Raspberry Pi, but it also contributes to your overall understanding of network security principles.
In summary, to effectively configure and utilize a firewall on your Raspberry Pi, remember the key steps:
- Installation: Ensure that you have the necessary hardware and a basic installation of Raspberry Pi OS.
- Configuration: Install and enable ufw, configuring the appropriate rules to permit required traffic, such as SSH.
- Testing: After enabling the firewall, test its functionality to confirm that it's working correctly.
- Maintenance: Regularly review your firewall rules and make adjustments as necessary to maintain the optimal level of security.
As your experience with Raspberry Pi and networking grows, consider exploring more advanced firewall configurations, such as those employing intrusion detection systems (IDS) or intrusion prevention systems (IPS), which provide additional security features. The world of cybersecurity is ever-evolving, and continuous learning is crucial to staying ahead of emerging threats. By implementing and configuring a firewall on your Raspberry Pi, you're taking a significant step toward securing your digital life and maintaining control over your online experience.


