Raspberry Pi Firewall: Secure Your Network Today!
Is your network a fortress or a sieve? The answer could be lurking within the confines of a tiny, unassuming Raspberry Pi, transformed into a powerful firewall router that stands guard against digital threats. This article unveils the secrets of leveraging this compact computing marvel to create a secure and efficient network environment.
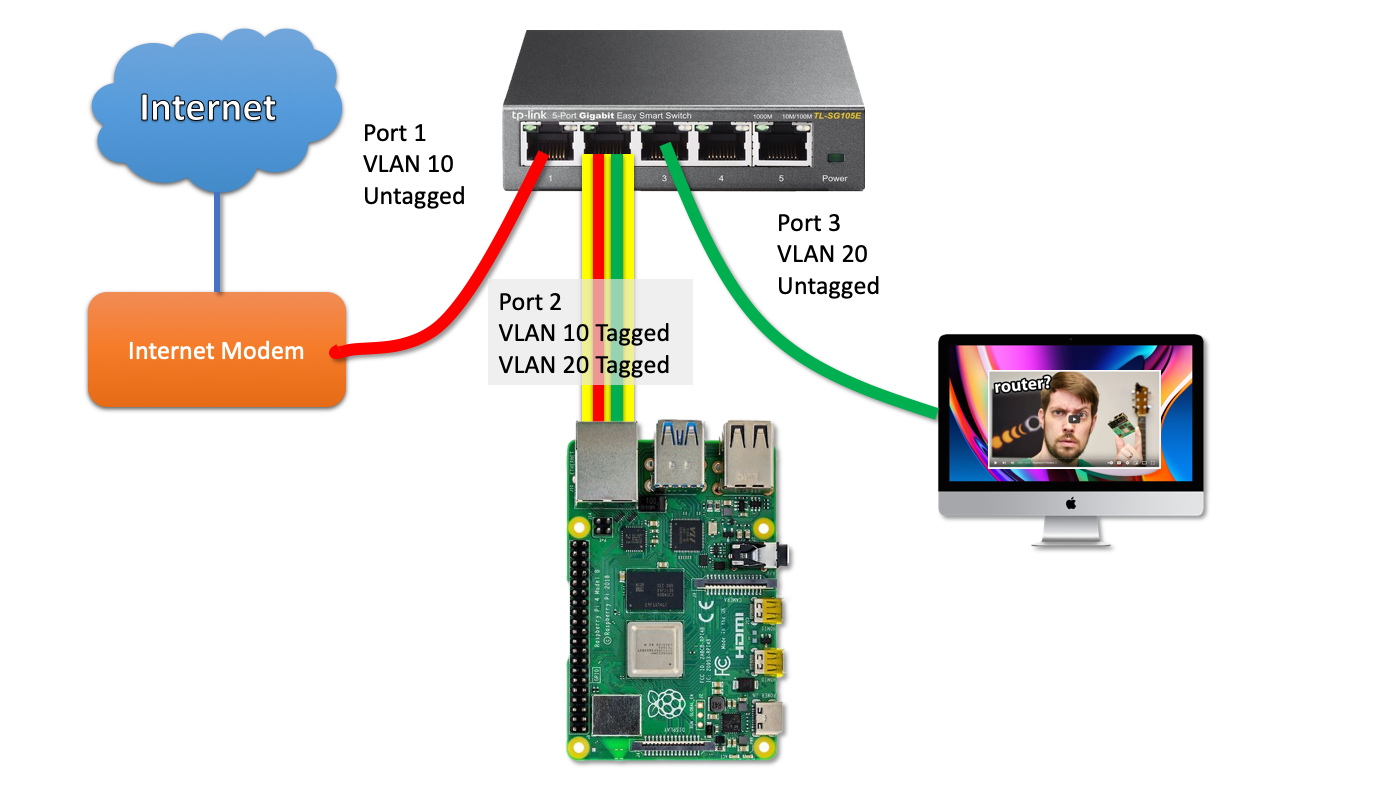
While a Raspberry Pi might seem an unconventional choice for a network router due to its single Ethernet adapter, it offers a surprisingly versatile solution. This limitation, however, can be cleverly circumvented, utilizing its built-in wireless adapter to create an access point, thereby routing traffic seamlessly to the LAN and the vast expanse of the internet. The journey from a simple single-board computer to a vigilant network sentinel is a rewarding one, and we'll navigate the crucial steps together.
This guide will dissect the process of configuring, securing, and troubleshooting your Raspberry Pi, converting it into a robust firewall router. From the initial setup to the fine-tuning of security protocols, you'll gain the knowledge to build a formidable protective barrier, safeguarding your digital assets. The essence of a firewall lies in its ability to meticulously control network traffic, an essential element for protecting against unauthorized access and malicious activity. Consider this a masterclass in cybersecurity, distilled to its most practical and effective components.
Let's delve into the specifics. The initial step involves preparing the Raspberry Pi for its new role. Begin by acquiring the necessary tools. You'll need a Raspberry Pi, of course, along with a microSD card to store the operating system. A power supply is also essential. Access to a computer to write the operating system image onto the microSD card is also required.
The first major step involves preparing the Raspberry Pi. Before anything else, you will need to download the operating system. The Raspberry Pi Foundation offers a variety of operating systems, but for this project, we recommend using Raspberry Pi OS (formerly Raspbian). The operating system is available from the official Raspberry Pi website. Download the image to your computer.
Once you have the operating system image, you will need to write it to your microSD card. This process can be done using a variety of tools. One of the most popular tools is BalenaEtcher. To begin this process, head to the official BalenaEtcher website and download the appropriate version for your operating system. Etcher is available for Windows, macOS, and Linux.
After downloading BalenaEtcher, install and open the application. The interface is straightforward. Select "Flash from file" and then select the Raspberry Pi OS image you downloaded earlier. Next, select the microSD card you intend to use. Finally, click "Flash" to start the writing process. This process will take several minutes. The process may also erase the contents of the microSD card, so be sure to back up anything you don't want to lose.
Once the flashing process is complete, the microSD card is ready for use in your Raspberry Pi. Eject the microSD card from your computer and insert it into the Raspberry Pi. Ensure all peripherals are disconnected, including the network cable.
The next step is the initial setup and configuration. Connect the Raspberry Pi to your network using an Ethernet cable. This connection allows you to access the device and configure it remotely. Once the Raspberry Pi is connected to the network, connect the power supply.
After booting the Raspberry Pi with the newly flashed microSD card, locate its IP address. You can find this in a couple of ways. The easiest method involves logging into your router and checking the connected devices list. The Raspberry Pi will appear there. Alternatively, if you have a monitor and keyboard connected to the Raspberry Pi, you can find the IP address by logging into the terminal with the default credentials (username: 'pi', password: 'raspberry'). Once logged in, type 'hostname -I' to display the device's IP address.
With the Raspberry Pi's IP address in hand, access the command-line interface (CLI) via SSH (Secure Shell). On most systems, you can use the SSH command, followed by the username@IP address. For instance, 'ssh pi@192.168.1.100'. You will be prompted for the password you created (default is "raspberry").
Once logged in via SSH, update the system packages by entering the following command: sudo apt update && sudo apt upgrade. This process updates the operating system's components to the latest versions, ensuring security and compatibility. It might take some time to complete.
The next vital step is to enable the firewall functionality of the Raspberry Pi. The most practical approach involves utilizing `ufw` (Uncomplicated Firewall), a user-friendly front-end for `iptables`. It significantly simplifies the configuration process.
Begin by installing `ufw` by typing: sudo apt install ufw. Once installed, we can set up the basic rules. Before enabling the firewall, we must ensure that SSH access is permitted; otherwise, you'll lock yourself out of the Raspberry Pi. To do this, type: sudo ufw allow ssh. You can also allow other services. For example, to allow HTTP traffic (port 80), type: sudo ufw allow 80.
After defining the necessary rules, enable the firewall. Enter: sudo ufw enable. You will be prompted to confirm the action. Type 'y' and press enter. The firewall will now be active. To check the status, type: sudo ufw status. This command displays the active rules and the overall firewall status.
While `ufw` provides a simple interface, the true power lies in the underlying `iptables`. Although a direct configuration is more complex, it offers granular control over network traffic. Advanced users can use it to craft sophisticated filtering rules.
Now let's configure the wireless adapter as an access point. This is crucial for the Raspberry Pi to function as a wireless router. First, install the necessary packages: sudo apt install hostapd dnsmasq. `hostapd` handles the access point, while `dnsmasq` provides DHCP and DNS services.
Next, configure the network interfaces. Edit the `/etc/network/interfaces` file. In some operating systems, this file might not be the central point for network configurations. In that case, you will have to check the system documentation and use a more recent alternative, such as `/etc/dhcpcd.conf`. This file contains the interface settings. You will need to set up a static IP address for the wireless interface (typically `wlan0`) and configure it to operate as an access point.
Create a configuration file for `hostapd` in `/etc/hostapd/hostapd.conf`. This file defines the SSID (network name), channel, and security settings for your wireless network. A basic configuration will include `interface=wlan0`, `ssid=YourNetworkName`, `wpa_passphrase=YourPassword`, and `wpa_key_mgmt=WPA2-PSK`. Securely generate a strong password.
Configure `dnsmasq`. Edit the `/etc/dnsmasq.conf` file to configure the DHCP server. This will assign IP addresses to the devices that connect to your wireless network. Define the IP range and DNS server. For example, `interface=wlan0`, `dhcp-range=192.168.4.2,192.168.4.20,255.255.255.0,24h`, and `dhcp-option=3,192.168.4.1`. This sets the IP range from 192.168.4.2 to 192.168.4.20, with the router's IP address as 192.168.4.1.
Enable IP forwarding. This is essential for routing traffic between the Ethernet and wireless interfaces and to the internet. Enable this by editing the `/etc/sysctl.conf` file and uncommenting the line that reads: net.ipv4.ip_forward=1. Apply the changes by running: sudo sysctl -p.
Finally, configure the routing rules with `iptables`. Set up Network Address Translation (NAT) to allow devices on your wireless network to access the internet. This involves creating a rule to masquerade traffic from the wireless interface to the Ethernet interface. This will typically be done with a command similar to: sudo iptables -t nat -A POSTROUTING -o eth0 -j MASQUERADE where `eth0` is your Ethernet interface. Replace it with the actual name of your interface if necessary.
After making these modifications, start and enable the services. Restart `hostapd` and `dnsmasq` with `sudo systemctl restart hostapd` and `sudo systemctl restart dnsmasq`. Enable them using `sudo systemctl enable hostapd` and `sudo systemctl enable dnsmasq`.
This setup offers a fundamental configuration that transforms your Raspberry Pi into a functional firewall router. Further customizations, such as traffic shaping or advanced filtering, can be implemented based on your specific network requirements. Regularly monitoring and logging network traffic can provide insights into potential security breaches or unusual network behavior, enabling informed decision-making.
To troubleshoot, begin by checking the basics. Ensure the correct interfaces are enabled and properly connected. Verify the IP addresses assigned to each interface. Check for typos in configuration files, as even a small error can disrupt functionality. Review system logs, which can reveal valuable information about errors and failures. Use tools such as `ping` and `traceroute` to diagnose connectivity issues.
In case of connectivity issues, temporarily disable the firewall to see if it's the cause. If the problem disappears, carefully review your firewall rules for any misconfigurations. If the wireless network is not broadcasting, double-check your `hostapd` settings, paying attention to the SSID and security settings. If devices cannot obtain IP addresses, examine the DHCP settings in `dnsmasq` and the IP address assignments.
This process is just the beginning. Raspberry Pis, in conjunction with properly configured firewalls, can add an important layer of security to your home or small business network. By consistently maintaining and updating your configurations, you can create a highly resilient and safe network. Moreover, the Raspberry Pi can be expanded to include additional security layers, such as Intrusion Detection Systems (IDS) and VPN servers, to improve your security posture.
The combination of the Raspberry Pi's versatility and the power of firewalls creates an ideal combination for a protected and efficient network. Whether you are tech-savvy or just beginning, this guide will equip you with the understanding to protect your digital environment. Embrace the power of a Raspberry Pi and its capabilities to keep your network secure.


