Can't Control Raspberry Pi Behind Router? Fix It!
Is your Raspberry Pi stubbornly refusing to cooperate, trapped behind the digital barricade of your router? The frustrating reality of a Raspberry Pi that can't be accessed remotely, despite your best efforts, is a common problem, but one that can often be overcome with a methodical approach and a little technical know-how. The desire to control your Raspberry Pi from anywhere, whether it's to monitor your home security system, manage your smart home devices, or simply tinker with your latest project, can quickly turn to despair when faced with the "not working" scenario. This article delves into the common culprits and provides actionable solutions to get your Raspberry Pi communicating effectively, even when hidden behind your router's protective shell.
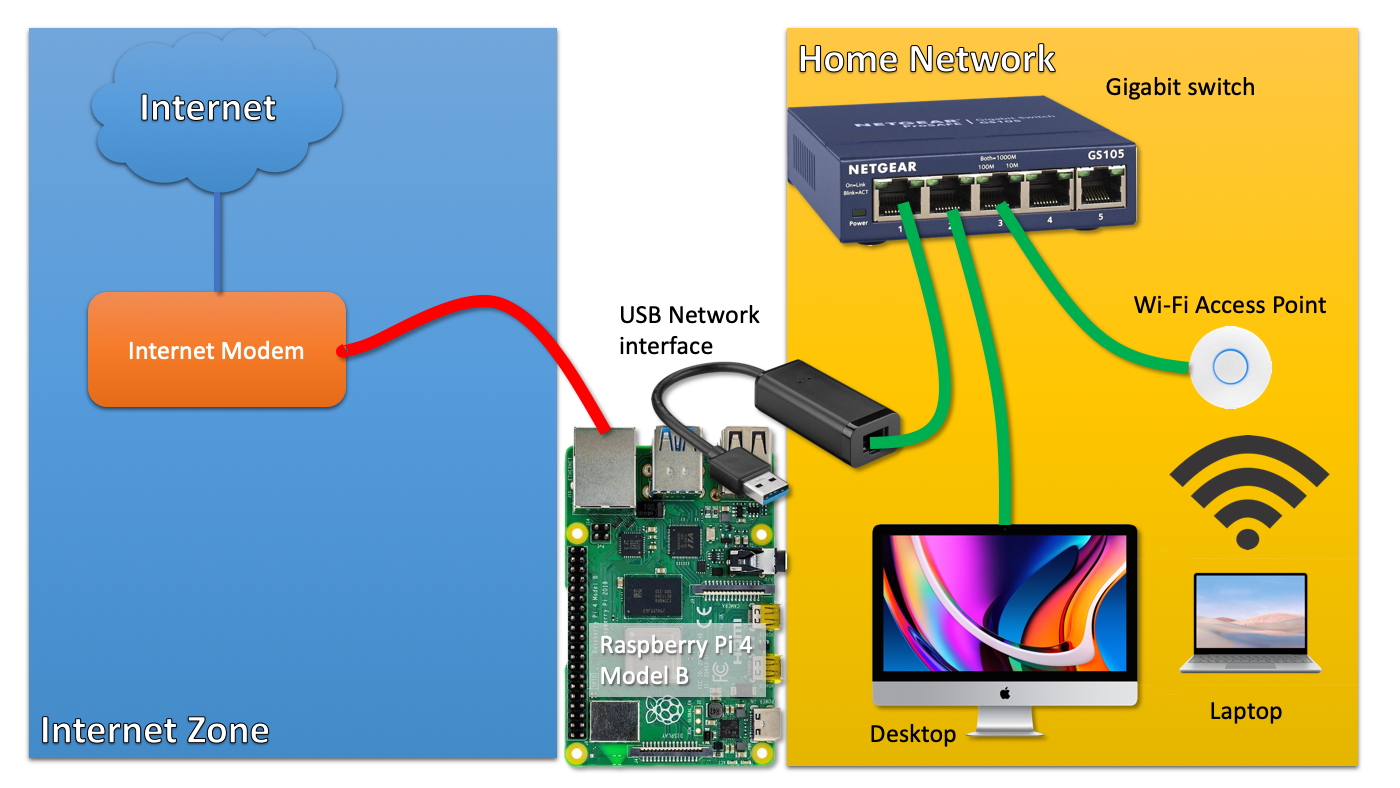
The predicament stems from the fundamental way routers operate. They're designed to protect the internal network, the collection of devices within your home, from external threats. They do this by assigning private IP addresses to your devices, making them invisible to the outside world. The Raspberry Pi, connected to your home network, receives one of these private IP addresses. When you try to access it from outside your network, you're effectively knocking on the wrong door. Your router, not knowing where to direct the incoming traffic, simply ignores the request. The problem is not necessarily with the Raspberry Pi itself, but with the communication barrier erected by the router. Overcoming this hurdle requires understanding and implementing a few key configurations.
Before proceeding with any troubleshooting steps, it's crucial to establish a baseline understanding of your network setup. Take note of the following:
- Your Router's Make and Model: This information is essential, as the specific configuration options (port forwarding, dynamic DNS, etc.) can vary significantly between different router manufacturers and models. You'll find this information typically printed on a sticker on the router itself or in its documentation.
- Your Raspberry Pi's IP Address: You can find this either through your router's administration interface (look for a list of connected devices) or directly on the Raspberry Pi's terminal (using commands like `ifconfig` or `ip addr`). The IP address is usually in the form of 192.168.x.x or 10.0.x.x. It's important to have a stable IP.
- The External IP Address of Your Router: This is the public IP address assigned to your router by your Internet Service Provider (ISP). You can usually find this by searching "what is my IP" on any search engine, or by consulting your router's admin panel.
- The Services You Want to Access: Determine which services you want to remotely access on your Raspberry Pi. Common examples include SSH (port 22), HTTP/HTTPS (ports 80/443), or custom applications you've developed. Knowing the specific ports used by these services is critical.
Now that we've established the preliminary facts, let's move into the most common solutions. They will often work in tandem with each other to ensure access.
Port Forwarding: The Gateway to Your Raspberry Pi
Port forwarding is the cornerstone of remote access. It's the process of instructing your router to forward incoming network traffic on specific ports to your Raspberry Pi. Think of it as opening a specific door on your router and directing any visitors to your Raspberry Pi. For example, if you want to SSH into your Raspberry Pi, you'll need to forward traffic on port 22. The specific configuration varies depending on your router's interface, but the general steps are as follows:
- Access Your Router's Admin Panel: This usually involves entering your router's IP address (e.g., 192.168.1.1 or 192.168.0.1) into your web browser. You'll then be prompted for your username and password (often "admin" and "password," but check your router's documentation for the correct credentials).
- Locate the Port Forwarding Section: This section is often found under the "Advanced," "Firewall," or "NAT" settings. The exact wording can vary.
- Create a New Port Forwarding Rule: You'll need to provide the following information:
- Service Name: A descriptive name for the rule (e.g., "SSH," "Web Server").
- Protocol: TCP, UDP, or both (for SSH, it's usually TCP).
- External Port: The port on which you want to access the service from outside your network (e.g., 22 for SSH). You can sometimes use a different external port for security reasons (e.g., 2222 instead of 22).
- Internal Port: The port your Raspberry Pi is using for the service (usually the same as the external port).
- Internal IP Address: The private IP address of your Raspberry Pi.
After configuring port forwarding, you should be able to access your Raspberry Pi from outside your network by entering your router's external IP address followed by the external port (if it's different from the standard port). For example, if your router's external IP is 123.45.67.89 and you've forwarded port 22, you'd use `ssh user@123.45.67.89` (assuming your username is "user") in your SSH client. If you used an external port of 2222, youd use `ssh user@123.45.67.89 -p 2222`.
Dynamic DNS: Taming the Ever-Changing IP
Your router's external IP address isn't static. It's assigned dynamically by your ISP, meaning it can change over time. This is a major problem, because if your IP changes, you won't be able to access your Raspberry Pi using the old IP address. Dynamic DNS (DDNS) services solve this problem by providing you with a static hostname that always points to your current external IP address. Think of it as a permanent address for your Raspberry Pi, regardless of the IP changes.
Here's how Dynamic DNS typically works:
- Choose a DDNS Provider: Several free and paid DDNS providers are available, such as DuckDNS, No-IP, and DynDNS. Choose a provider that suits your needs. DuckDNS is a popular free option.
- Sign Up for an Account: Create an account with your chosen DDNS provider and register a hostname (e.g., myraspberrypi.duckdns.org).
- Configure Your Router: Most routers have built-in support for DDNS. Log into your router's admin panel and locate the DDNS configuration section. You'll typically need to enter your DDNS provider's service, your hostname, and your username and password. Consult your router's documentation for specific instructions.
- Alternatively, Configure on Raspberry Pi: If your router doesn't support DDNS, you can install a DDNS client on your Raspberry Pi. For example, with DuckDNS, you can install the `duckdns` package and configure it to update your IP address automatically.
Once DDNS is configured, you can access your Raspberry Pi using your hostname instead of your dynamic IP address. For example, you would use `ssh user@myraspberrypi.duckdns.org`.
Firewall Considerations: Don't Let the Gatekeeper Block You
Both your router and your Raspberry Pi have firewalls that can block incoming connections. Make sure your router's firewall isn't blocking the ports you've forwarded. Most routers have basic firewall settings that you can customize. Check the router's documentation to confirm any settings. Ensure incoming traffic on the ports you've forwarded is permitted.
On the Raspberry Pi itself, the `ufw` (Uncomplicated Firewall) is a common firewall management tool. If `ufw` is enabled, you'll need to allow incoming connections on the ports you're using. For example, to allow SSH traffic, you would run `sudo ufw allow ssh`. Then, to enable the firewall, run `sudo ufw enable`. It is important that before enabling the firewall, you allow the incoming connections, otherwise you may be locked out.
Testing and Troubleshooting: Finding the Root Cause
Once you've configured port forwarding and DDNS, test your setup to ensure everything is working. Try accessing your Raspberry Pi from a device outside your home network (e.g., your smartphone using mobile data, or from a friend's network). If you're still having trouble, systematically troubleshoot the problem.
Here are some troubleshooting steps:
- Double-Check Your Configuration: Review all the steps meticulously. Ensure you've entered the correct IP addresses, ports, and protocols. Typos are a common source of errors.
- Reboot Your Router and Raspberry Pi: Sometimes, a simple reboot can resolve connectivity issues.
- Verify Port Forwarding with Online Tools: Several online port checker tools can verify whether your ports are open. Search for "port checker" in a search engine and use one of these tools to test your ports. If a port checker reports that a port is closed, it means the router isn't forwarding the traffic correctly or something else is blocking it (e.g., the Pi's firewall).
- Check Your ISP's Policies: Some ISPs block certain ports or restrict remote access. Check your ISP's terms of service to see if they have any restrictions on remote access.
- Disable Other Services Temporarily: If you're running other services on your Raspberry Pi that use the same ports or are related, disable them temporarily to isolate the issue.
- Check Your Raspberry Pi's Network Configuration: Ensure your Raspberry Pi is configured to use a static IP address, rather than DHCP. DHCP assigns a dynamic IP, so setting a static IP address can help stability. You can configure a static IP either through your router's admin panel (assigning a static IP to the Pi based on its MAC address), or by manually configuring the network settings on your Pi (editing `/etc/dhcpcd.conf`).
- Examine Logs: Check the logs on both your Raspberry Pi and your router for error messages. On the Raspberry Pi, you can check the system logs using the command `journalctl -xe`. Router logs can provide valuable clues about any blocked connections.
Security Best Practices: Fortifying Your Fortress
Opening your Raspberry Pi to the outside world introduces potential security vulnerabilities. It is vital to take the following precautions:
- Change the Default Password: The default username and password for the Raspberry Pi (pi/raspberry) is a major security risk. Change these credentials immediately.
- Use Strong Passwords: Choose strong, unique passwords for all your accounts.
- Keep Your Software Updated: Regularly update your Raspberry Pi's operating system and all installed software to patch security vulnerabilities. Run `sudo apt update` and `sudo apt upgrade` periodically.
- Use SSH Key Authentication: Instead of using passwords for SSH access, use SSH key authentication for a more secure connection. This involves generating a key pair (a private key and a public key). The public key is placed on your Raspberry Pi, and you use the private key to authenticate your SSH connections.
- Consider Using a VPN: For enhanced security, consider using a Virtual Private Network (VPN). You can set up a VPN server on your Raspberry Pi or use a VPN service. This will encrypt all traffic between your device and the Raspberry Pi.
- Monitor Your Logs: Regularly review the logs on your Raspberry Pi for suspicious activity.
- Limit Access: Only forward the ports you absolutely need. Close any ports not in use.
- Enable Two-Factor Authentication (2FA): If possible, enable 2FA for any services you use on your Raspberry Pi.
- Regularly Back Up Your Data: Back up your Raspberry Pi's data regularly in case of a security breach or hardware failure.
Alternative Solutions and Considerations
While port forwarding and Dynamic DNS are the most common solutions, other alternatives are available, each with its own set of trade-offs:
- Reverse Proxy: A reverse proxy acts as an intermediary between your Raspberry Pi and the outside world. It receives requests from clients, then forwards those requests to your Raspberry Pi. This can improve security and performance. Popular reverse proxy servers include Nginx and Apache.
- VPN Server on Your Router: Some routers offer built-in VPN server functionality. This allows you to connect to your home network securely through a VPN connection, eliminating the need for port forwarding.
- Cloud-Based Services: Services like TeamViewer or AnyDesk provide remote access solutions without requiring you to configure port forwarding. These services often use their own servers as intermediaries, but may have limitations in terms of features or performance.
- SSH Tunnels: SSH tunnels can be used to create a secure connection through an SSH server to access other services on your Raspberry Pi. This is more advanced and may be more suitable for experienced users.
- IPv6: If your ISP provides IPv6 connectivity, this eliminates the need for port forwarding, as each device has its own unique public IP address. However, IPv6 support is not yet widespread.
The best approach depends on your individual needs, your technical expertise, and the capabilities of your network. Consider the security implications and choose the solution that strikes the right balance between usability and security.
Troubleshooting Checklist: A Step-by-Step Guide
To ensure you don't miss any steps, it is useful to use a checklist. Before you start it is important to have the Router's brand and model, the Pi's IP address and your public IP address.
- Obtain Information:
- [ ] Router's Brand and Model
- [ ] Raspberry Pi's Private IP Address
- [ ] Router's Public IP Address
- Port Forwarding (If Applicable):
- [ ] Access Router Admin Panel
- [ ] Locate Port Forwarding Section
- [ ] Create New Port Forwarding Rule(s) (SSH, Web, etc.)
- [ ] Set Protocol (TCP, UDP, or Both)
- [ ] Enter Raspberry Pi's IP Address
- [ ] Set External and Internal Port(s)
- [ ] Save the Rule(s)
- Dynamic DNS (If Applicable):
- [ ] Choose a DDNS Provider (DuckDNS, No-IP, etc.)
- [ ] Sign Up for a DDNS Account
- [ ] Configure Router's DDNS Settings (if supported)
- [ ] Or, Install and Configure a DDNS Client on the Raspberry Pi
- [ ] Obtain and Configure Hostname (e.g., myraspberrypi.duckdns.org)
- Firewall Configuration:
- [ ] Check Router's Firewall Settings
- [ ] Ensure Incoming Traffic is Allowed on Forwarded Ports
- [ ] Check Raspberry Pi's Firewall (ufw)
- [ ] Allow Incoming Traffic (e.g., `sudo ufw allow ssh`)
- [ ] Enable Firewall (`sudo ufw enable`)
- Testing and Verification:
- [ ] Attempt Access from Outside the Network (e.g., Using Smartphone Data)
- [ ] Use the External IP Address and Port
- [ ] Or, Use the Dynamic DNS Hostname
- [ ] Test SSH Connection with the command `ssh pi@`
- [ ] Test web connection with the command `http://:`
- [ ] If Port is not working, use Port Checkers Tool
- Troubleshooting (If Access Fails):
- [ ] Double-Check All Configuration Settings
- [ ] Reboot Router and Raspberry Pi
- [ ] Verify Ports with Online Port Checker
- [ ] Check ISP Restrictions
- [ ] Disable Other Services Temporarily
- [ ] Check Raspberry Pi's Network Configuration (Static IP?)
- [ ] Examine Logs (Raspberry Pi and Router)
- Security Best Practices:
- [ ] Change Default Password(s)
- [ ] Use Strong Passwords
- [ ] Keep Software Updated
- [ ] Consider SSH Key Authentication
- [ ] Consider a VPN
- [ ] Monitor Logs
- [ ] Limit Access to Necessary Ports
Conclusion: Putting It All Together
Controlling a Raspberry Pi behind a router is an achievable task, provided you approach it systematically and understand the underlying concepts. This comprehensive guide has laid out the key steps: understanding your network, configuring port forwarding and/or Dynamic DNS, addressing firewall concerns, and implementing security best practices. By following these guidelines, you can successfully unlock the full potential of your Raspberry Pi, allowing you to access your projects from anywhere in the world. The world of remote access is a blend of knowledge, patience, and a little bit of luck. Remember to prioritize security every step of the way. With the right combination of configuration and vigilance, you can transform your Raspberry Pi from a local project into a globally accessible one.


