[Guide] How To Connect Raspberry Pi Behind Your Router
Could your Raspberry Pi, that tiny marvel of computing, be significantly more powerful and accessible than you currently realize? The true potential of a Raspberry Pi is often unlocked when it's ingeniously connected behind a router, transforming it from a standalone gadget into a versatile, networked powerhouse capable of a wide array of functions, from home automation hubs to secure remote servers. The process, while sounding complex to some, is remarkably straightforward, and the benefits are substantial.
The essence of connecting a Raspberry Pi behind a router lies in understanding the interplay between your home network, the router's role as a gateway, and the Pi's configuration. This connection allows your Raspberry Pi to access the internet and, crucially, be accessed remotely. This opens up a world of possibilities, but the details matter. Lets delve into the practical steps, considerations, and security measures to successfully connect your Raspberry Pi behind your router and harness its full potential.
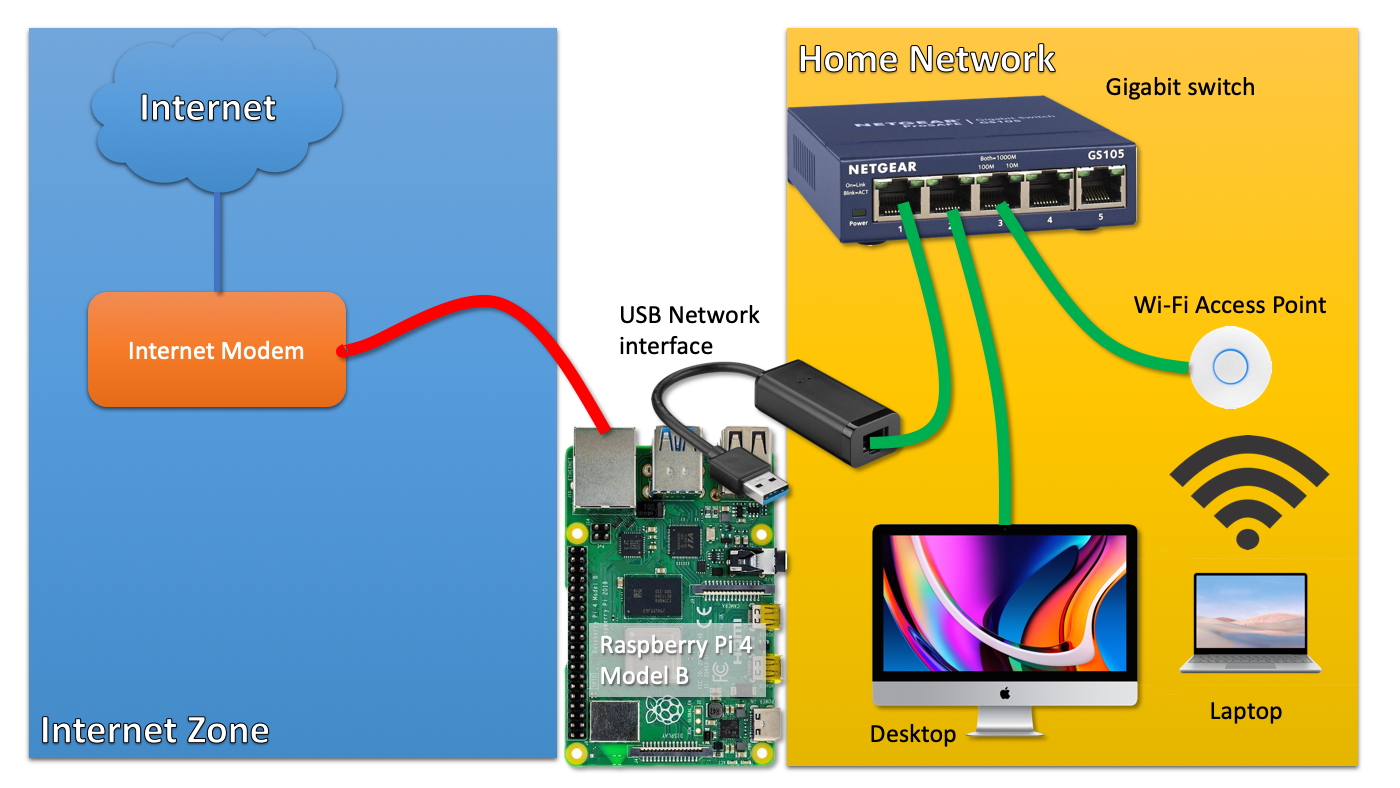
Let's take a closer look at the central concept: connecting your Raspberry Pi behind a router. The core of the operation involves the router acting as the intermediary between the Raspberry Pi and the internet. When your Raspberry Pi is connected to your router, it gets assigned a local IP address. This address allows devices within your local network (your computers, phones, other devices connected to the same router) to communicate with the Raspberry Pi. However, if you want to access your Raspberry Pi from outside your home networkfor example, when you're at work or on vacationyou'll need to configure your router to forward traffic to the Raspberry Pi.
One of the immediate advantages of connecting your Raspberry Pi behind a router is that you gain access to the internet. This is crucial for almost every application you might want to use your Raspberry Pi for, from downloading software to accessing the internet, and for any network activity. The connection allows your Raspberry Pi to receive software updates, download files, and interact with online services. But the benefits extend far beyond basic internet access. A significant advantage is enhanced security. Routers often have built-in firewalls that act as a first line of defense against unauthorized access to your home network. When the Raspberry Pi is behind the router, it benefits from this protection. Furthermore, you can implement additional security measures on your Raspberry Pi, which further secure your setup.
The process isn't complex, but it requires careful attention to detail. The first step is physically connecting your Raspberry Pi to your router. This is typically done using an Ethernet cable. Connect one end of the cable to your Raspberry Pi's Ethernet port and the other end to a free Ethernet port on your router. Once physically connected, the Raspberry Pi needs to be configured to connect to your local network. This usually involves setting up a static IP address on your Raspberry Pi to make it easier to find on your network. The Raspberry Pi's operating system (usually Raspberry Pi OS, formerly Raspbian) has network configuration tools that allow you to set a static IP address, configure a default gateway (your router's IP address), and set DNS servers.
Beyond the basic configuration, understanding the router's role is crucial. Routers function as the gateway to the internet for all devices on your home network. They have a public IP address, which is the address the outside world uses to find your network. Each device within your home network is assigned a private IP address. These private addresses are not visible outside your network. For your Raspberry Pi to be accessible from outside your network, you need to configure your router to forward specific ports to the Raspberry Pi's private IP address. This process is known as port forwarding. Port forwarding tells your router to direct incoming traffic on a particular port to the Raspberry Pi's IP address. For example, if you are running a web server on your Raspberry Pi, you might forward port 80 (HTTP) and port 443 (HTTPS) to your Raspberry Pi.
Setting up port forwarding can be slightly different depending on your router's make and model. The specific instructions will be in your routers manual, or on the manufacturers website. Generally, youll need to log in to your router's administration interface, typically by entering your router's IP address in your web browser. Once you're logged in, navigate to the port forwarding section and create a new rule. You'll need to specify the port number, the protocol (usually TCP or UDP, or both), the Raspberry Pi's private IP address, and enable the rule. After setting up port forwarding, you should be able to access your Raspberry Pi from outside your local network by using your router's public IP address, followed by the port number. However, for security reasons, it is often recommended to use a dynamic DNS service instead of your public IP address.
Dynamic DNS services provide a static hostname that always points to your changing public IP address. Your public IP address can change periodically, so relying on it directly can be problematic. Dynamic DNS services automatically update your hostname whenever your public IP address changes. Services like DuckDNS, No-IP, and DynDNS offer free or paid dynamic DNS services. To use a dynamic DNS service, youll need to sign up for an account with the service provider. After signing up, you will receive a hostname (e.g., myraspberrypi.duckdns.org). Then, you install a client on your Raspberry Pi that will update your hostname with your current public IP address.
When it comes to security, several steps can be taken to protect your Raspberry Pi. First, change the default password for the Pi's user account. The default password is widely known, so changing it is the first and most crucial step. You should also enable a firewall on your Raspberry Pi. Firewalls restrict network traffic based on preconfigured rules. Uncomplicated Firewall (UFW) is a user-friendly firewall for Debian-based systems, including Raspberry Pi OS. Install UFW using the command `sudo apt update && sudo apt install ufw` and then configure it. Then consider using SSH keys for secure remote access. Instead of using a password to log in via SSH, you can use SSH keys for a more secure authentication method.
Beyond fundamental security measures, consider additional security practices. Regularly update your Raspberry Pi's operating system and all installed software. Software updates frequently include security patches that address known vulnerabilities. Monitoring your Raspberry Pi's logs can also provide insights into any suspicious activity. The logs record various events, including login attempts, system errors, and other potentially malicious activities. Setting up intrusion detection systems (IDS) can help to detect malicious activities on your network. An IDS will monitor your network traffic and alert you to any suspicious behavior. Be sure to only open the necessary ports on your router. The fewer open ports, the smaller the attack surface. Regularly review your port forwarding rules and disable any that are no longer needed. And, of course, back up your Raspberry Pi's data regularly. This protects your data from data loss due to hardware failures or security breaches.
The applications of a Raspberry Pi connected behind a router are nearly limitless. It's excellent as a home automation hub, managing smart devices, controlling lights, and monitoring environmental sensors. It's ideal as a media server, storing and streaming movies, music, and photos. Its a fantastic platform to host a personal cloud, allowing you to store and access your files from anywhere. You can also use it as a VPN server, providing secure access to your home network from anywhere in the world, encrypting your internet traffic. You can also use it as a development platform, for experimenting with software development, testing code, and hosting web applications. Furthermore, connect Raspberry Pi behind a router, and you can use it for network monitoring, tracking network traffic, and detecting potential security threats.
Let's illustrate this with a hypothetical example. Imagine a homeowner, Sarah, wants to remotely monitor her home's security cameras. She connects her Raspberry Pi to her router. She installs the necessary software, configures a static IP address for her Pi, and sets up port forwarding on the router. She sets up a dynamic DNS service so that she can access her Pi, even if her public IP address changes. Because her Pi is connected behind her router, she can securely access her security camera feed from anywhere, providing peace of mind, and protecting her property.
Troubleshooting potential issues is a crucial skill in setting up a Raspberry Pi behind a router. If you can't access your Raspberry Pi from outside your local network, the first thing to check is the router's port forwarding rules. Make sure the rules are correctly configured, with the correct port numbers, the correct protocol, and the correct IP address for the Raspberry Pi. Double-check the Raspberry Pi's static IP address, and confirm that it is correct and that the Raspberry Pi is connected to the network. Then, verify that the Raspberry Pi is powered on and running. If youre using a dynamic DNS service, ensure that it's correctly configured and that your hostname is updated with your current public IP address. Then, try using a port scanner to verify that the ports you have forwarded are open and accessible from the internet. Finally, check your Raspberry Pi's firewall settings; make sure they are not blocking any incoming traffic.
In conclusion, connecting a Raspberry Pi behind a router is a powerful and versatile solution for anyone wanting to expand the capabilities of this miniature computer. It allows you to access your Raspberry Pi from anywhere, enhancing its utility for home automation, media streaming, remote server applications, and many other tasks. The process, though it requires some understanding of networking concepts, is achievable by following the steps outlined, and the security measures, such as setting up a firewall, changing default passwords, and enabling SSH keys, make the setup very safe. By understanding the relationship between the Raspberry Pi, the router, and the internet, and by taking the right steps, you can transform your Raspberry Pi into a powerful and useful device that enhances your digital life and provides new possibilities. Embrace the power of "connect Raspberry Pi behind router," and unlock the full potential of your small but mighty computer.


