Raspberry Pi Network Monitoring: Your Guide To Home & Office
Are you losing sleep over network hiccups? Effective network monitoring is no longer a luxury; it's the cornerstone of a stable and secure digital environment, whether you're running a business or managing a smart home.
In the fast-paced realm of modern technology, a robust and vigilant network is the lifeblood of seamless operations. In a business environment, this translates to reliable communication, the crucial protection of sensitive data, and the vital reduction of downtime. The stakes are just as high, if not higher, when considering home networking. From streaming your favorite shows to conducting essential remote work, a dependable network is essential for maintaining productivity and keeping connected. This is where the power of proactive network monitoring comes into play.
Raspberry Pi Network Monitoring
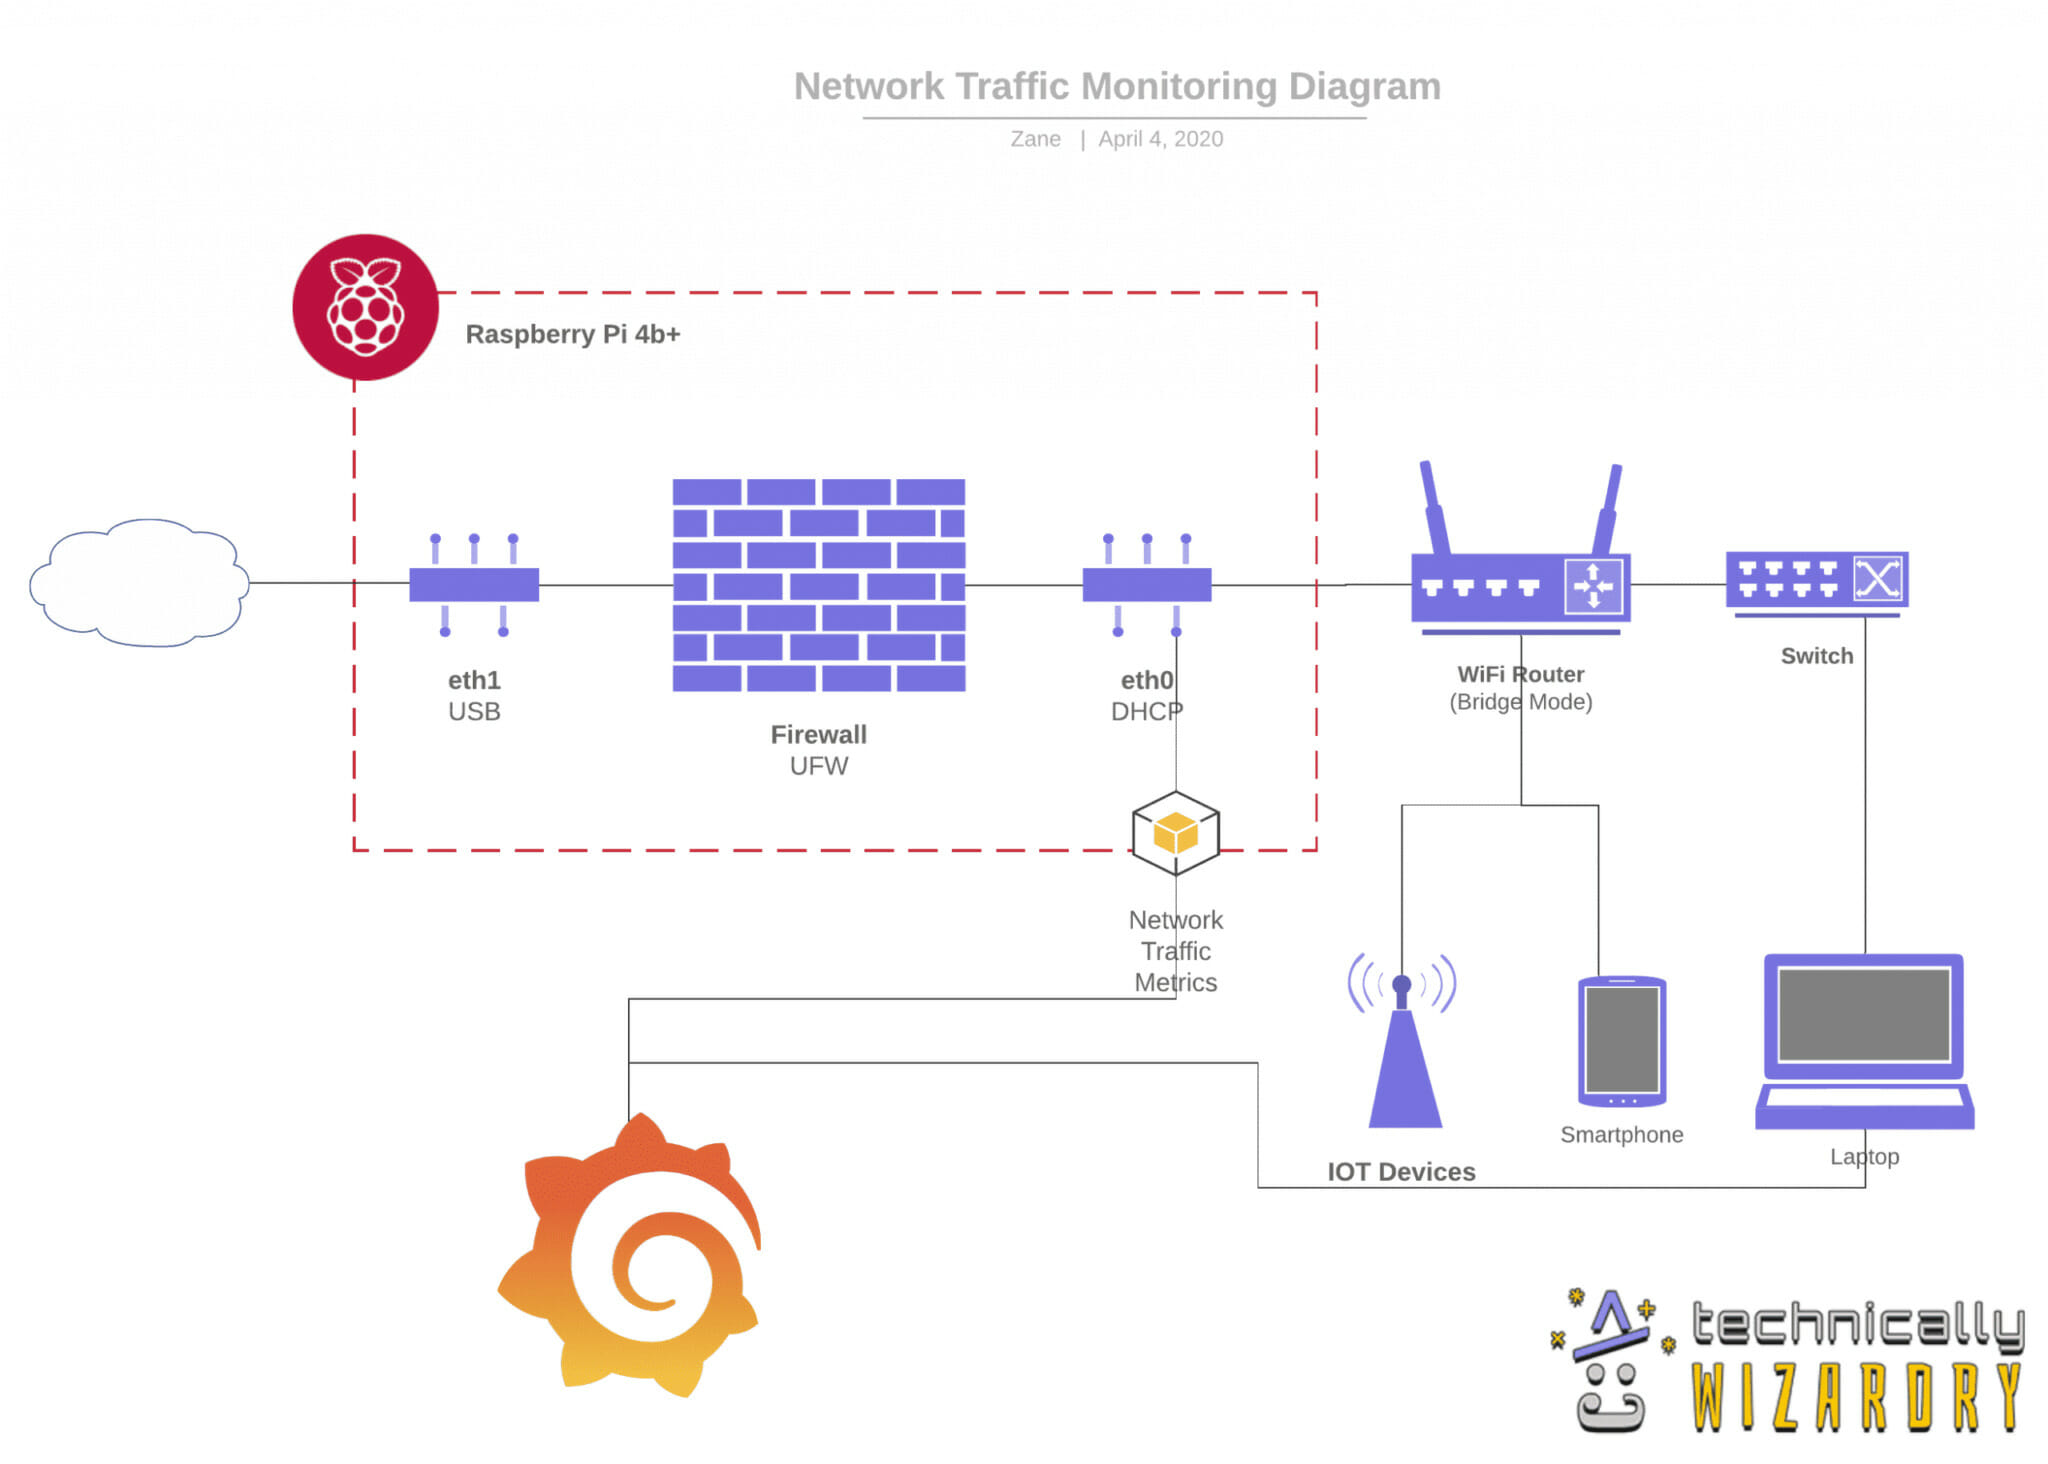
At its core, Raspberry Pi monitoring is a practice of utilizing a compact, cost-effective computerthe Raspberry Pito actively analyze and understand how your network is performing and behaving. But what exactly is Raspberry Pi monitoring, and how does it fit into your larger digital strategy?
Here's a breakdown:
- Foot Patrol for Your Network: Raspberry Pi monitoring acts as a tireless watchman, constantly scanning and evaluating your network's activity, traffic patterns, and overall health.
- Data-Driven Insights: It provides real-time data and historical trends, transforming raw network activity into understandable metrics and visualizations.
- Proactive Problem Solving: By identifying potential issues before they escalate, Raspberry Pi monitoring allows you to proactively address problems and maintain optimal network performance.
- Tailored to Your Needs: It offers a flexible platform that can be customized to fit your specific requirements, whether you're troubleshooting connectivity problems or simply striving to understand your network usage.
| Aspect | Details |
|---|---|
| What is Monitored | Network traffic, performance metrics, device availability, security threats |
| Tools Used | Nagios, Darkstat, Iperf, Ntopng, Perfsonar, LibreNMS, Cacti |
| Advantages | Cost-effective, Customizable, Flexible, Lightweight, Remote Sensor |
| Disadvantages | Requires technical knowledge, Initial setup time |
| Best Raspberry Pi Model for Network Monitoring | Raspberry Pi 4 Model B (4GB recommended) |
| Primary Functions | Troubleshooting, performance measurement, alerting |
For more information, visit: Raspberry Pi Official Website
To truly harness the power of this technology, you will want to understand the various tools available.
Tools of the Trade
The Raspberry Pi's adaptability shines through in the breadth of network monitoring tools it supports. System administrators and home users alike have access to a comprehensive suite of open-source applications designed to give a clear view of their network.
- Nagios: A robust and widely-used monitoring system, Nagios is known for its reliability, scalability, and versatility. It allows you to monitor various aspects of your network, from host availability to application performance.
- Darkstat: This utility offers an elegant solution for capturing and analyzing network traffic. Its strength lies in its ability to calculate statistics and present the data in easy-to-understand graphs via a web interface.
- Iperf, Ntop, and Perfsonar: These applications are specifically tailored for measuring network performance. Iperf is used to test the maximum TCP and UDP bandwidth, while Ntop provides real-time network traffic analysis, and Perfsonar is ideal for identifying network bottlenecks.
- LibreNMS: Another comprehensive monitoring solution, LibreNMS, is designed to monitor various network devices and services and provides detailed performance metrics.
- Cacti: This web-based network monitoring and graphing tool provides a complete front-end for the RRDTool, storing all necessary information to draw useful graphs.
To begin your journey into Raspberry Pi network monitoring, you need to have a clear understanding of basic requirements and configurations.
Getting Started
Setting up your Raspberry Pi as a network monitoring tool can appear daunting at first, but the process is generally straightforward. The core steps include:
- Hardware: You'll need a Raspberry Pi (model 4 B recommended), a microSD card for the operating system, an Ethernet cable for the initial setup, and a power supply.
- Operating System: Install an operating system on your Raspberry Pi. Raspberry Pi OS is a common choice. You can use the Raspberry Pi Imager tool to write the OS to the microSD card.
- Static IP Address: Assign a static IP address to your Raspberry Pi to ensure it remains accessible on your network. This is usually done through your router's configuration settings.
- Software Installation: Install your chosen network monitoring tool (Nagios, Darkstat, etc.) using the command line.
- Configuration: Configure the monitoring tool to meet your specific needs by editing configuration files. This usually involves defining the devices you want to monitor, the metrics to track, and any alerts.
Many network monitoring tools can use the Raspberry Pi as a remote sensor.
Nagios
One of the most popular tools is Nagios, which is relatively lightweight. Lightweight means it is perfect to run on your Raspberry Pi, allowing you to maximize the amount you can do on a single device.
Heres how to turn your Raspberry Pi into a network monitoring tool using Nagios:
- Installation: After installing the OS on your Raspberry Pi, you'll need to install Nagios. This process typically involves running a few commands to install necessary packages.
- Configuration: Modify the Nagios configuration file to monitor the desired hosts and services. You can define a host group, like Raspberry Pi, and apply the same services to all the hosts inside this group.
- Monitoring: Once configured, Nagios will begin monitoring your network. You can access the Nagios web interface to view the status of your hosts, services, and receive alerts.
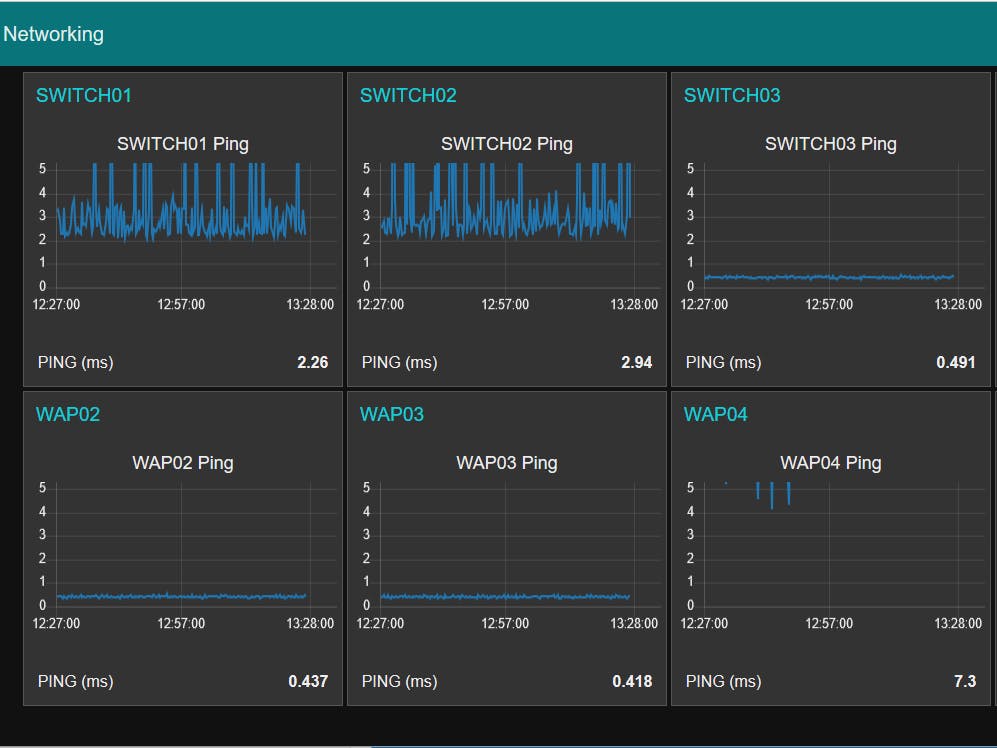
To use ping to monitor a Raspberry Pi, follow these steps:
- Connect a computer to the same network as the Raspberry Pi (Wi-Fi, Ethernet, or VPN).
- On the Raspberry Pi, find the IP address by opening a terminal and typing: `hostname -I`
- From your computer, open a terminal or command prompt.
- Use the `ping` command followed by the Raspberry Pi's IP address: `ping [Raspberry Pi IP address]`
Beyond the Basics
While the fundamental setup of Raspberry Pi network monitoring is quite accessible, there are more advanced techniques to explore for improved performance, data analysis, and security.
- Alerting: Configure alerts to receive notifications when specific network conditions arise. This could include latency spikes, downtime of a critical server, or unusual traffic patterns.
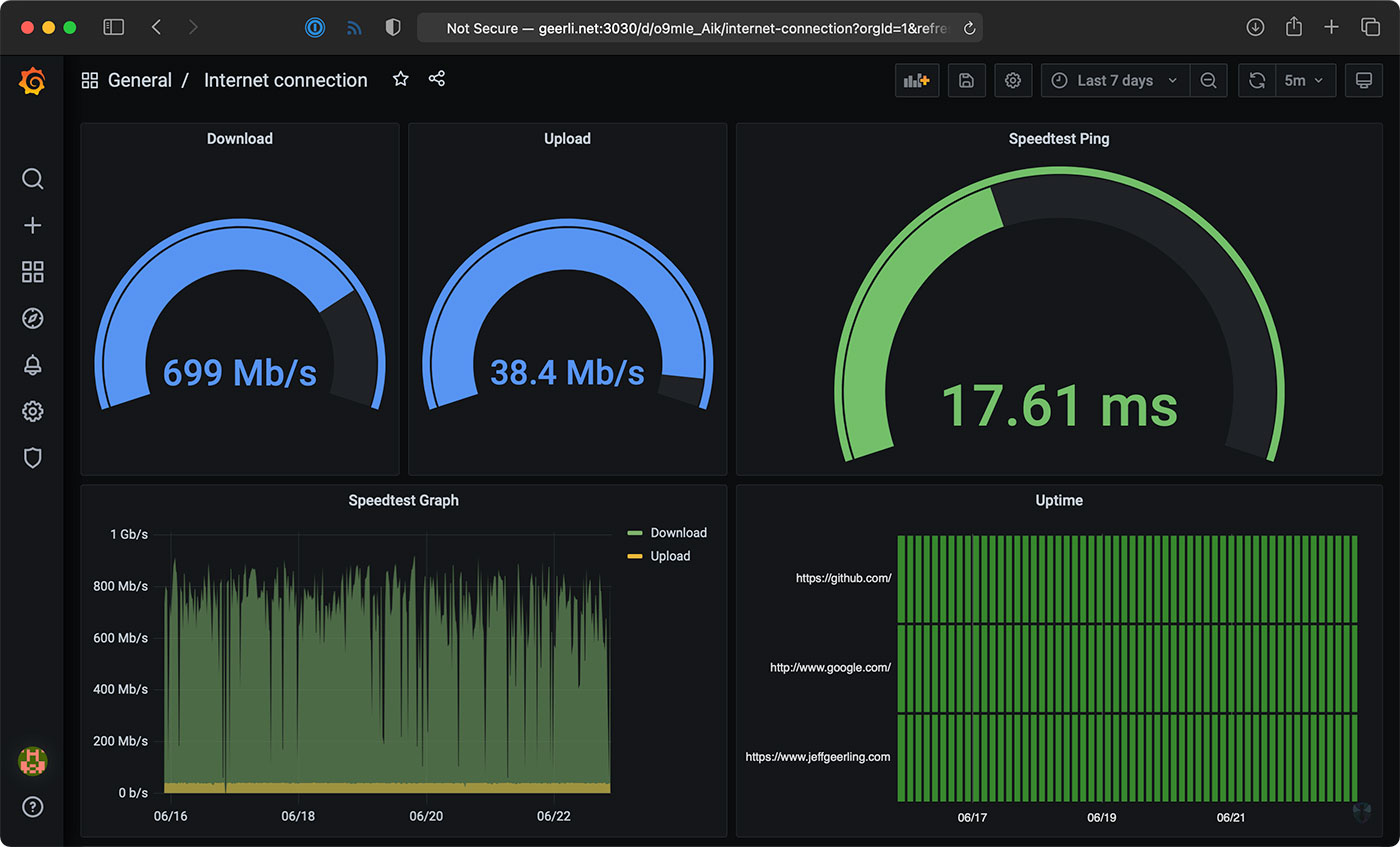
- Data Visualization: Explore tools like Grafana to create custom dashboards and visualize your network data.
- Security Hardening: Secure your Raspberry Pi by changing the default password, enabling SSH, and keeping your OS and applications up to date.
- Docker: Using Docker containers to run network monitoring tools like LibreNMS can simplify management, upgrades, and configuration.
In this guide we recommend using the 1st letter of your first name followed by your last name. For john doe, your username would be jdoe. Open the Raspberry Pi Imager tool to begin, then click the choose OS button.
In the operating system selection menu, press the use custom option. You'll need to find and select your NEMS image file (in the img file format).
With the NEMS image file selected, click choose SD card to select your microSD card. Once you're ready to write the image to your SD card, press the write button.
Weighing the Advantages and Disadvantages
While the Raspberry Pi provides a highly flexible and cost-effective solution, it's important to consider its strengths and weaknesses.
- Advantages: Cost-effective, Customizable, Flexible, Lightweight, Remote Sensor, Suitable for Home and Small Business Networks.
- Disadvantages: Requires technical expertise. The Wi-Fi traffic going to the router will not be monitored. Initial setup time.
Raspberry Pi monitoring offers the advantage of providing many tools that system administrators can use to monitor network traffic, newer raspberry pi models even come with a built in wifi chip in addition to the traditional ethernet port, giving us even more options for connecting to networks and monitoring traffic.
Network performance monitoring (NPM) is the continuous monitoring of network performance or your business' core network infrastructure to establish a network baseline, monitor network issues, and identify any network performance degradation. Making sure there's no problem with your network.
Having a Pi monitoring my internet continuously makes it easy to see trends over time, or confirm outages. If you just spot-check by running a speed test every now and then, you don't have much data to go on.
Keeping Your Network Secure
Network security is another essential aspect of the process of network monitoring.
For boosting your network security at home or in the office, the Raspberry Pi is a capable choice to use for that purpose.
These features include: network filtering, threat detection, and the ability to identify and address security threats as they arise.
The Road Ahead
The realm of network monitoring is constantly evolving. As network technology advances, so does the need for continuous learning and adaptation.
For the example below, I'll monitor my raspberry pi zero from the raspberry pi where Nagios is installed.
Over time, you may forget all the tools that you have loaded on your pi.
Next, the Cacti install will want to know about the database in which you intend to store the piles of data that Cacti collects every 5 minutes.
We can now configure the Raspberry Pi monitoring on LibreNMS.
With the right approach, your network will be better prepared to withstand the ever-evolving threats and ensure peak performance.
